Ventilation is crucial in indoor growing for temperature control, humidity control, and air exchange for photosynthesis and optimal plant growth.
Without proper ventilation, your plants suffer from problems related to excessive heat or humidity and lack of fresh air or moisture, negatively impacting photosynthesis and causing decay in plants.
A good ventilation system keeps the temperature and humidity levels at optimal levels, prevents plant burns, mold, and stress, offers good filtration, and boosts plant growth and yield.
You should change the air in your grow tent at least once every 3 to 5 minutes. But, marijuana plants do well with an air exchange every 1-3 minutes due to their high oxygen consumption and CO2 production. So, for example, you’re growing marijuana in a 4x4x6 ft (96 cubic feet) grow tent.
To calculate the fan size needed for proper ventilation, take the volume of your space in cubic feet and multiply it by the number of desired air exchanges per minute. If we aim for a complete air exchange every two minutes, we divide 96 (cubic feet) by 2 (minutes) to get a fan size of 48 CFM (Cubic Feet per Minute).
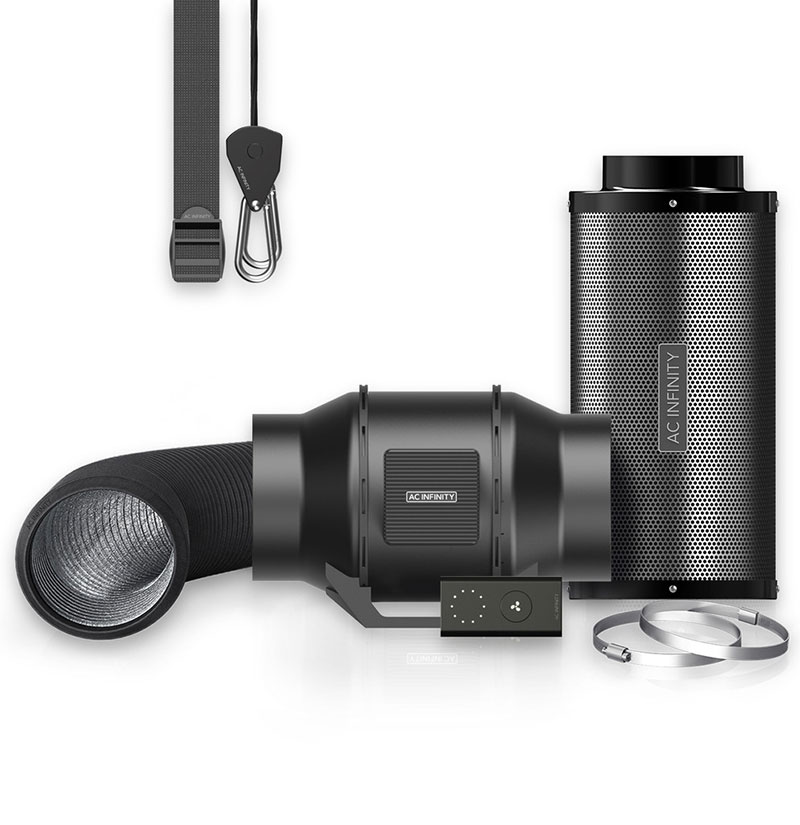
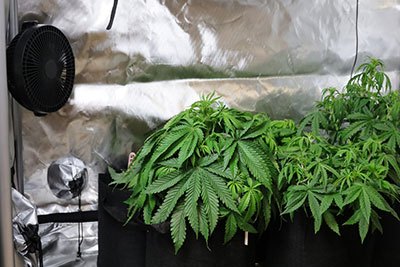
The components of the ventilation system include an inline duct fan (active exhaust fan), intake fan, circulation fan, carbon filter, duct tubes, and fan speed controller. Each of these components has its role, and together, they ensure cooler air and adequate airflow efficiency for optimal fan performance and healthy indoor vegetation without burns or plant death.
Table of Contents
- What is a Grow Tent Ventilation System?
- Why is Optimizing the Ventilation System Important?
- 6 Main Components of Ventilation System for Indoor Growing
- 6 Steps to Set Up a Ventilation System in a Grow Tent
- Step 1: Size Your Ventilation System Components
- Step 2: Select the Type of Ventilation Setup
- Step 3: Install Your Exhaust Fan & Carbon Filter
- Step 4: Install Your Intake Fan
- Step 5: Hang & Position Your Circulation Fans
- Step 6: Automate the Grow Tent Ventilation Setup
- How Do You Set Up Vivosun Grow Tent Ventilation
- Step 1: Prepare the necessary equipment
- Step 2: Tie up the carbon filter belt
- Step 3: Hang up the carbon filter
- Step 4: Tie up the rope hanger
- Step 5: Hang up the inline fan
- Step 6: Connect the ducting with the fan
- Step 7: Tuck away the excess rope
- Step 8: Hang up your grow light
- Step 9: Adjust the height of your light
- How Does Grow Tent Ventilation Work?
What is a Grow Tent Ventilation System?
A ventilation system is a technology designed to maintain the quality of air in different types of environments (grow rooms, greenhouses, houses, etc.). It’s a mechanism that moves air in and out of an indoor space, ensuring proper air circulation.
A grow room ventilation system is crucial in maintaining optimal plant growth conditions. It pumps fresh air into the tent, regulates temperature and humidity levels, eliminates unpleasant odors, and ensures that the climate within the tent can be separately managed and controlled.
The basic ventilation components include an intake fan, an exhaust fan, ducting, a carbon filter, an air-cooled reflector or cool tube, and a thermometer/hygrometer.
- The intake fan pulls fresh air into the grow tent, giving the plants the carbon dioxide they need for photosynthesis.
- The exhaust fan pushes old air out, removing excess heat and humidity and helping to prevent the growth of mold and other pathogens that harm the plants.
- Ducting is the tubes that carry air in and out of the tent. They connect the fans to the outside environment and must be properly sealed to prevent leaks.
- The carbon filter removes odors from the air before exhausting from the grow tent. The carbon filter is particularly important when growing plants with strong odors.
- Air-cooled reflectors or cool tubes are valuable if you’re using HID lights. The air-cooled reflector helps remove the heat it produces directly at the source before it enters your grow room atmosphere.
- A thermometer or hygrometer monitors the temperature and humidity levels inside the tent, allowing you to adjust the ventilation system as needed to maintain an optimal growing environment.
Why is Optimizing the Ventilation System Important?
Optimizing the ventilation system is important in a grow tent because it regulates temperature/humidity and provides fresh air for the plants. It also helps to prevent mold and pests and helps remove odors.
While you can technically grow plants indoors without ventilation, it’s not recommended. Lack of ventilation leads to stagnant humidity levels that promote the growth of mold and pests.
Indoor plants need a fresh supply of carbon dioxide for photosynthesis, and without proper ventilation, the air supply is not adequately provided. Poor ventilation also causes heat build-up from grow lights, harming the plants by stress and burns.
The proper ventilation system in a grow tent provides benefits such as helping plants with respiration and photosynthesis, reducing heat from grow lights, maintaining ideal humidity, isolating the growing environment from the rest of the grow room, preventing molds and pests, and simulates wind stress.
Plants need carbon dioxide (CO2) for photosynthesis – the process of converting light into energy. A well-ventilated room ensures a fresh supply of CO2. Additionally, plants respire just like humans, exhaling oxygen and inhaling CO2. Adequate ventilation facilitates this exchange of gases, promoting healthier plants.
Indoor grow lights produce a significant amount of heat. Without proper ventilation, this heat builds up and harms the plants. An efficient grow tent ventilation system helps dissipate this heat, maintaining an optimal temperature for plant growth.
Plants lose water to the air through a process called transpiration. If the air becomes too humid, it leads to problems like mold growth. The grow tent ventilation system helps maintain the right humidity levels by circulating the air and removing excess moisture.
Ventilation systems equipped with carbon filters remove odors associated with indoor gardening, ensuring that these odors don’t permeate the rest of your home.
Poorly ventilated spaces can become breeding grounds for mold, fungi, and pests. A proper ventilation system prevents such pests by reducing excess moisture and keeping the environment less hospitable for these undesirables.
In nature, plants are exposed to wind, which helps them grow stronger stems and branches. In an indoor setting, fans in the ventilation system simulate this wind stress, promoting stronger, healthier plant growth.
6 Main Components of Ventilation System for Indoor Growing
The ventilation system for indoor growing has 6 main components for optimal environmental conditions, including an inline duct fan, intake fan, circulation fan, carbon filter, duct tubes, and fan speed controller.
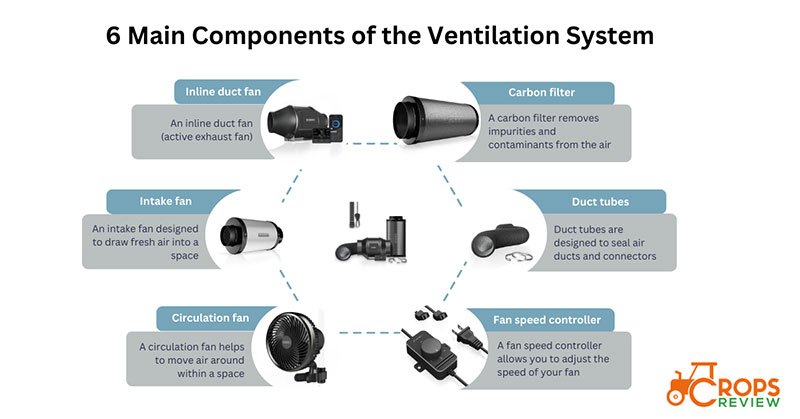
1. Inline Duct Fan (Active Exhaust Fan)
An inline duct fan (active exhaust fan) is a type of ventilation device installed directly into your ducting. It’s a powerful tool for improving airflow and controlling temperatures and humidity levels in various spaces (grow tents, grow rooms, greenhouses, etc.).
The exhaust fan extracts stale air and moisture from the indoor space and replaces it with fresh air from the outside.
When choosing the best inline duct fans, consider size, durability and quality, power and airflow, and energy efficiency. Such factors ensure optimal plant growth by maintaining a healthy environment, prolonging the lifespan of your equipment, and saving on energy costs.
2. Intake Fan
An intake fan is a ventilation system component designed to draw fresh air into a space. When in a grow tent, the intake fan provides a consistent supply of fresh air, which is vital for plant photosynthesis as it contains the carbon dioxide plants need. It also helps maintain a balanced temperature and humidity level within the space.
An intake fan essentially pulls fresh air from outside into the grow tent. This air is usually cooler and drier than the air inside the tent, which helps to regulate temperature and humidity levels.
When choosing the best intake fan, consider its size, airflow capacity, noise level, energy efficiency, and durability. Such factors help you decide the high-quality fan performance for your grow tent ventilation setup and suitable air circulation for indoor growing plants.
The size and capacity of the intake fan are smaller or the same size as the exhaust fan but run at a lower capacity because you need negative pressure within the grow space. The negative pressure helps control the odor, manage temperature, and ensure fresh air is evenly distributed to all plants. If the inline fan is too powerful, it creates positive pressure, leading to odors escaping the grow room, uneven air distribution, and humidity control.
3. Circulation Fan
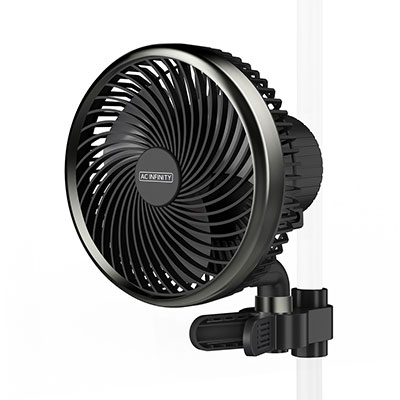
A circulation fan, also known as an oscillating fan, is a device that helps to move air around within a space, ensuring it doesn’t become stagnant.
The circulation fan in a grow tent system aids in evenly distributing heat, humidity, and CO2 throughout the grow space, ensuring all plants receive the necessary environmental conditions for growth. It also helps to strengthen plant stems by creating a gentle breeze that mimics natural outdoor conditions.
Choosing the best circulation fan based on size, adjustability, noise level, ease of installation, and durability ensures optimal air distribution, a comfortable growing environment, easy setup, and device longevity, ultimately promoting healthier plant growth.
4. Carbon Filter
A carbon filter, also known as an activated carbon filter, is a filtration system that removes impurities and contaminants from the air. Carbon filters use a bed of activated carbon to absorb these substances.
Carbon filters are primarily used to control odors, but they can also help to improve the overall air quality by removing other airborne particles and contaminants. They are particularly useful in indoor growing environments with problematic odors.
When choosing the best carbon filter, consider benefits, including quality of carbon, filter thickness, size, durability, and ease of installation. Such factors ensure the maximum odor control and a longer lifespan of the carbon filter.
5. Duct Tubes
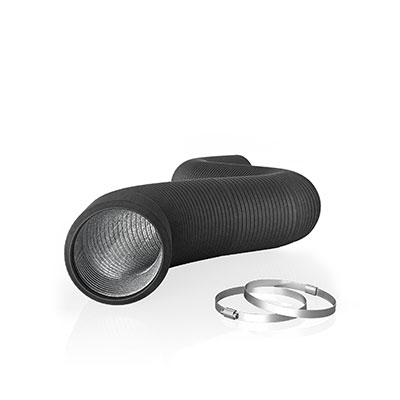
Duct tapes, specifically HVAC (Heating, Ventilation, and Air Conditioning) tapes, are adhesive tapes used in ventilation systems. They are designed to seal air ducts and connectors, ensuring that no air is lost through gaps or leaks in the system.
Not all duct tape can be used for such a purpose. Standard, general-purpose duct tapes are not engineered to withstand the extreme temperature changes that can occur in HVAC systems. Instead, specific HVAC tapes, often made of aluminum foil, should be used.
To choose duct tapes for your grow tent ventilation, consider material, adhesive quality, temperature resistance, and UL listing. The Underwriter Laboratories runs the UL listing and states that the product meets nationally recognized standards for sustainability and safety.
The duct tubes reduce airflow resistance, thereby maximizing the efficiency of your ventilation system and ensuring optimal temperature and humidity levels for plant growth.
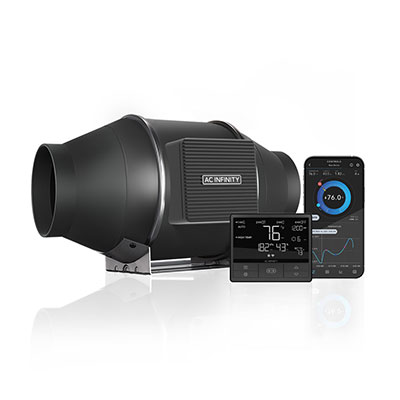
6. Fan Speed Controller
A fan speed controller in a ventilation system is a device that allows you to adjust the speed of your fan, providing precise control over airflow and ventilation levels.
When considering the fan speed controller for tent ventilation, consider factors like compatibility, adjustability, ease of use, build quality, and extra features such as temperature and humidity sensors to make the fan speed adjustments effortlessly.
Such a system ensures flexible, efficient, and user-friendly ventilation that automatically adjusts to environmental changes, promoting optimal plant growth conditions.
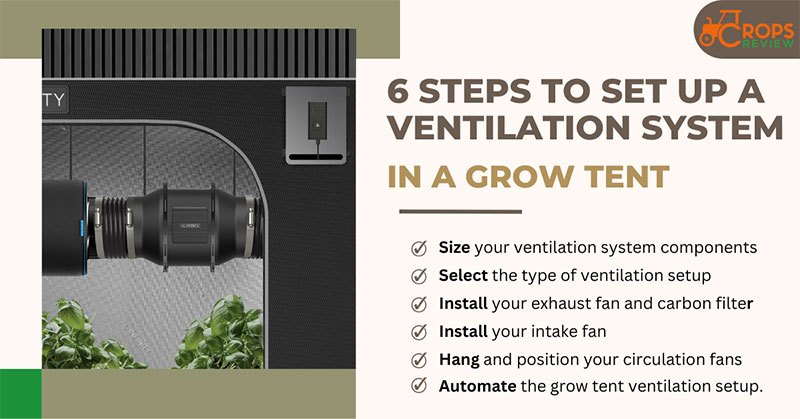
6 Steps to Set Up a Ventilation System in a Grow Tent
To complete your grow tent ventilation setup correctly, you must:
- Size your ventilation system components.
- Select the type of ventilation setup.
- Install your exhaust fan and carbon filter.
- Install your intake fan.
- Hang and position your circulation fans.
- Automate the grow tent ventilation setup.
You must invest in high-quality equipment to last longer, providing good growing conditions without higher humidity or temperature. If you invest in poor-quality equipment, it easily breaks, and you must replace it immediately, causing more costs. Poor quality parts also cause more heat and humidity in the grow room, so you risk the health of the indoor plants.
Step 1: Size Your Ventilation System Components
To set up a proper ventilation system for your grow tent, you must determine the size of your exhaust fan, intake fan, and carbon filter.
The exhaust fan size is calculated based on the volume of your grow space. The general rule of thumb is that your exhaust fan should be able to exchange the air in your grow space every minute (1 CFM per cubic foot of your grow space).
For example, if you have a grow tent that is 4’x4’x6′, the volume of your grow space is 96 cubic feet. Therefore, you need an exhaust fan with at least a 96 CFM rating.
However, it’s better to get a fan with a higher CFM than you need to account for factors like filters and ducting that can reduce airflow. So, take a 100-300 CFM exhaust fan for your grow room.
Once you have chosen the exhaust fan, select an appropriate intake fan. Grow room intake fans should be 20-30% less powerful than the exhaust fans. So you should get either two fans of exactly the same size and run the intake at lower speed settings, or you can get two different intake and exhaust fans – a 4-inch intake fan and a 6-inch exhaust fan.
The size of your carbon filter needs to match your exhaust fan. The filter needs to be able to handle the volume of air being pushed through it by the fan. Therefore, if your exhaust fan has a 96 CFM rating, you need a carbon filter rated for at least 96 CFM.
In addition to these components, you’ll need circulation fans to help distribute air evenly throughout your grow space, ducting to connect your fans and filter, and a speed controller to adjust your fan speeds as needed. You also need hangers or straps to secure everything in place.
Step 2: Select the Type of Ventilation Setup
To set up the ventilation system in your grow tent, you can choose among the various ventilation setup modes, including fan and filter outside, filter inside/fan outside, filter outside/fan inside, and fan and filter outside.
Fan and Filter Inside: This setup is straightforward to install. The disadvantage is that it takes up space within the grow area, reducing available grow room for plants. It also adds heat to the environment, which may need to be managed.
Filter Inside, Fan Outside: This setup helps to reduce heat buildup inside the tent as the fan is outside. However, the ducting might be longer, which can reduce the fan’s efficiency due to increased airflow resistance.
Filter Outside, Fan Inside: This setup is less common as it could lead to odor issues because unfiltered air is ducted outside the grow space before it’s filtered.
Fan and Filter Outside: This setup maximizes space inside the grow tent but requires more complex ducting. It also effectively reduces heat inside the tent.
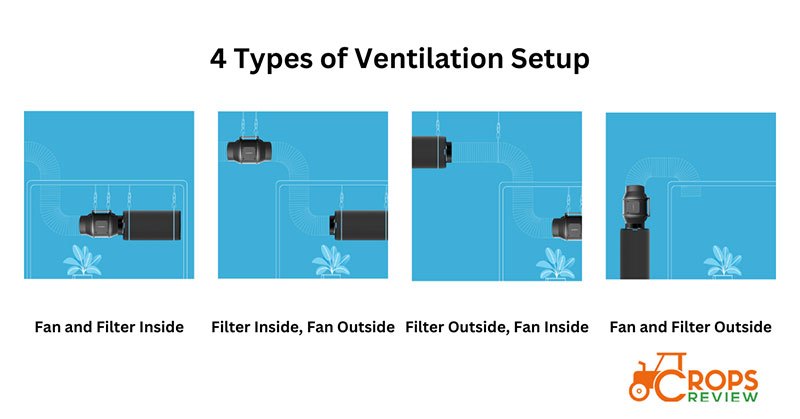
The most popular grow room ventilation setup is having both the exhaust fan and the carbon filter inside the grow tent. Hanging the extraction fan at the highest point possible is recommended as heat rises, and exhausting this hot air will make the grow room cooler for the plants.
The ideal setup can vary depending on specific situations, such as space availability, heat management, and odor control.
- If space is limited inside the grow room, having the fan and filter outside might be a better option.
- If heat buildup is a concern, positioning the fan outside can help reduce the temperature inside the growing space.
- If controlling odors is a priority, it’s better to have the filter inside the grow space to ensure the air is filtered before it’s exhausted.
When choosing a model, consider the length and path of the ducting. Longer ducting or ducting with many bends increases airflow resistance, reducing the fan’s efficiency. Therefore, it’s crucial to minimize the length of the ducting and avoid unnecessary bends.
Also, consider maintaining negative pressure inside the grow tent, which helps control odors and ensures fresh air is pulled in. The intake hole should be three to four times larger than the exhaust hole.
You also need to determine whether to use passive or active airflow for the grow space ventilation.
Passive airflow relies on natural air movement and pressure differences to circulate air. Vents or openings at the bottom of the grow space allow fresh air in, while an exhaust fan at the top removes warm air. It’s simple, cost-effective, and quiet, but it may not provide sufficient ventilation for larger spaces or high-heat setups.
Active airflow involves using intake and exhaust fans to control air circulation actively. It provides better control and is more effective for larger grow spaces or high-heat setups. However, it’s more complex, costly, and louder.
Step 3: Install Your Exhaust Fan & Carbon Filter

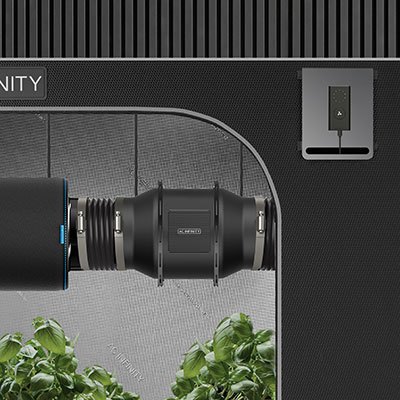
To install the exhaust fan and carbon filter, secure the carbon filter in your preferred location inside the grow tent, such as directly connected to your inline fan, inside the grow space, or at the beginning of the air circulation system. You can use belts or hangers to hang the filter from the tent’s ceiling.
You don’t need ducting when directly connecting your carbon filter to your inline fan. This option is ideal if you’re not using a grow light hood. It saves space and eliminates the need for long ducting.
When your fan is outside the tent with a carbon filter inside, you can secure an inline fan directly on top of the flange of the carbon filter or set up ducting to attach the two. This setup helps reduce heat buildup inside the tent.
If the carbon filter is at the beginning of the air circulation system, it ensures the air is filtered before it’s exhausted. If you have a duct system, it’s best to install the carbon filter at the beginning of the system.
To set up the fan and carbon filter, attach the exhaust fan to the carbon filter. You can make an attachment directly or by using ducting. Secure the connection with clamps or zip ties.
If you’re using ducting, run it from the fan to your preferred exhaust point. Keep the ducting as short and straight as possible to maximize airflow efficiency.
Install your intake fan near the bottom of the tent to pull in the fresh air. The intake fan should be slightly less powerful than the exhaust fan to maintain a slight negative pressure inside the tent.
Please plug in and test your fans to ensure they work properly.
Step 4: Install Your Intake Fan
Consider size, placement, ducting, and sealing factors to install the intake fan. Your intake fan should be slightly smaller than your exhaust fan to maintain negative pressure inside the grow space.
To calculate the CFM (Cubic Feet per Minute), you need for proper ventilation, use the following formula:
(Grow Space Width x Length x Height) / 5 = Recommended CFM
Install your intake fan near the bottom of the tent, either inside or outside.
If you place the fan outside the grow tent, ducting channels fresh air into the grow space. The ducting should be clamped or taped onto your inline duct fan.
Ensure your grow tent is properly sealed. A sealed grow tent ensures air only passes through the intake hole and leaves through the exhaust fan.
An inside placement is more straightforward and requires less ducting, but it could take up valuable space within the growing area. An outside placement saves space inside the tent but might require more complex ducting.
An interior fan can directly push fresh air into the grow space, which is more efficient. On the other hand, an exterior fan pulls fresh air into the space, which could be more effective if there are significant obstructions in the ducting.
Step 5: Hang & Position Your Circulation Fans
Attach hangers along the support bars of your grow space ceiling to hang and position the circulation fans.
Installing two circulating fans is beneficial in a larger grow space that exceeds 4 feet by 4 feet. However, for smaller tents, a single fan is usually sufficient.
Contrary to the intake and exhaust fans, this circulation fan can operate continuously, all day and night, irrespective of whether the grow lights are switched on or off.
Step 6: Automate the Grow Tent Ventilation Setup
To automate the grow tent ventilation setup, use automated fans that can be set to turn on and off during the day and night or when the humidity levels and temperature reach optimal standards, such as 70-75% and 70–85°F/21-30°C for vegetative stages.
Install temperature and humidity controllers to monitor the climate inside your grow tent and adjust the fans accordingly. When the temperature or humidity exceeds a threshold, the controller activates the fan to bring it back down.
Connect your fans to smart plugs. The smart plugs allow you to control the power supply remotely via an app, and you can set schedules for your fans to follow.
How Do You Set Up Vivosun Grow Tent Ventilation
To set up the Vivosun grow tent ventilation, you need to follow 9 steps below:
- Prepare the necessary equipment.
- Tie up the carbon filter belt.
- Hang up the carbon filter.
- Tie up the rope hanger.
- Hang up the inline fan.
- Connect the ducting with the fan.
- Tuck away the excess rope.
- Hang up your grow light.
- Adjust the height of your light.
Step 1: Prepare the necessary equipment
You need an inline fan, a carbon filter, and ducting to set up the ventilation system.
Step 2: Tie up the carbon filter belt
Upon unboxing the VIVOSUN 6″ carbon filter, you’ll find a carbon filter, a replaceable pre-filter, and some belts included in the package.
Start by verifying whether the pre-filter, identifiable by its white fabric, is already encasing the carbon filter. If not, ensure you slip it on before proceeding with the hanging of the filter.
Take one belt and position it beneath the carbon filter. Fold the belt approximately 20-25 inches from its buckle, ensuring that the folded portion aligns horizontally with the buckle.
Thread the folded belt through the second opening of the buckle and then reverse it back through the first hole. Secure the belt as tightly as possible to ensure stability. Follow the same procedure to secure the second belt.
Step 3: Hang up the carbon filter
Remove the E pole from the tent and thread it through the belts you’ve just secured. Reattach the E pole to the tent. Ensure the carbon filter doesn’t lean against anything that can impede ventilation.
The filter should be kept level, maintaining a parallel alignment with the support poles. If the filter appears tilted in any way, adjust the straps until it is properly positioned.

Step 4: Tie up the rope hanger
Use rope ratchet hangers as they simplify the process of modifying the fan’s height. Pass the rope hanger through the bottom part of the inline fan, ensuring that the adjustable hook is slightly lower than its counterpart.
Attach the adjustable hook to the rope situated on the fan’s opposing side. Carry out the same procedure with the additional hanger on the fan’s other side.
Loop the lengthier side of the rope (the one with a non-adjustable hook) around the E pole and secure it by hooking the rope with the fixed hook.
Step 5: Hang up the inline fan
The adjustable hook features a yellow button, which is used to modify the hanging height of the inline fan.
Exercise caution while adjusting the height to prevent accidentally dropping the fan. It’s advisable to support the base of the inline fan with your hands to prevent it from falling.
Once the carbon filter and the inline fan are aligned at the same level, you can snugly fit the fan’s flange into the carbon filter. We recommend using ventilation tape to connect them securely to ensure an airtight seal.
Step 6: Connect the ducting with the fan
Ducting is packaged similarly to a tension-free spring—simply extend it by pulling it to your desired length. If it’s too long or if you want to divide it into multiple sections, scissors, and a wire cutter can be used to cut the ducting.
To securely fasten the ducting to your fan, utilize a ducting clamp. Slide it onto the ducting before attaching it to the fan, then move the ducting clamp over the junction point.
On the ducting clamp, you’ll find a small screw that can be tightened with a screwdriver or an electric drill. Tighten the clamp sufficiently to ensure an airtight connection.
Step 7: Tuck away the excess rope
Wind the rope around the same pole from which you’ve hung the fan, and then slip the end of the rope under the coiled rope.
Step 8: Hang up your grow light
If you’re using LED grow lights, use a rope hanger (the side with the adjustable hook) first to connect the hook of the LED, then hang it on the F pole.
Coil any surplus rope around the F pole to keep it tidy and out of the way. It’s not advisable to hang the grow light before setting up the ventilation system.
Due to its weight, it can only be suspended from the F pole (either one is fine), and it should be positioned lower than the ventilation system.
Step 9: Adjust the height of your light
If you need to modify the height of your LED, press the yellow button and lift the left side of the rope. Make sure to hold the hook of the LED light while making height adjustments.
How Does Grow Tent Ventilation Work?
Grow tent ventilation works as a system to regulate the climate inside the grow tent, ensuring optimal growing conditions for plants.
The exhaust fan pulls the old, warm air out of the tent and pushes it outside. As the fan removes air from the tent, it decreases the air pressure inside the tent compared to the outside.
The fresh air coming in is cooler, which helps lower the overall temperature inside the tent. The cycle of pushing out old air and drawing in fresh air helps regulate the tent’s temperature, humidity, and carbon dioxide levels.
How Much Ventilation Does My Grow Tent Need?
If you have a small 2×2 grow tent, you need one inline fan used as the exhaust fan. You also need one carbon filter and one small oscillating fan to cover the 4 square feet of the space.
If you have a 6×6 grow tent, you need two inline fans, one as the intake and one as the exhaust fan, or a more powerful exhaust fan of around 43.2 CFM per minute. If you grow cannabis in a 6×6 tent, you need two carbon filters to kill the strong smell and at least two oscillating fans.
What Size Ventilation is Needed for a 4×4 Grow Tent?
You need an exhaust fan of 6 inches for your 4×4 grow tent. You also need a 6-inch carbon filter and a 6-inch duct size to match the exhaust fan and carbon filter.
Do Grow Tents Need to Be Vented Outside?
Yes, grow tents need to be vented outside. By venting the grow tent outside, you prevent overheating your tent, prevent excessive humidity levels, and ensure fresh air inside the tent.
Grow lights, especially high-intensity discharge (HID) lights, produce much heat. You can prevent your tent from becoming too hot by venting the hot air outside.
Plants release moisture into the air through a process called transpiration. If this moisture isn’t vented outside, it increases your grow tent’s humidity levels, leading to mold and mildew issues.
Plants need carbon dioxide (CO2) to photosynthesize. Continually venting your grow tent ensures that your plants always have a fresh supply of CO2.
However, you don’t need to vent your grow tent and carbon filter outside if you have already installed the carbon filter inside the tent. Due to the lower outside temperature, you don’t have to vent the tent outside during winter. You also don’t have to vent it outside if you have smaller 2×2 or 4×4 tents, as they allow between 2 and 6 plants, so there is no need for extra ventilation.
How Often Should I Run My Grow Tent Ventilation?
You should run your grow tent ventilation system continuously, 24/7. Such working time ensures that fresh air, which is rich in carbon dioxide, is constantly supplied to the plants and excess heat and humidity are removed.