Setting up your grow tent involves 7 main steps:
- Assembly: Assemble the tent frame according to the manufacturer’s instructions.
- Cover: Pull the fabric cover over the frame once assembled.
- Install Lighting: Hang the lights from the bars at the top of the tent.
- Install Ventilation: Install the fans and ducting for ventilation.
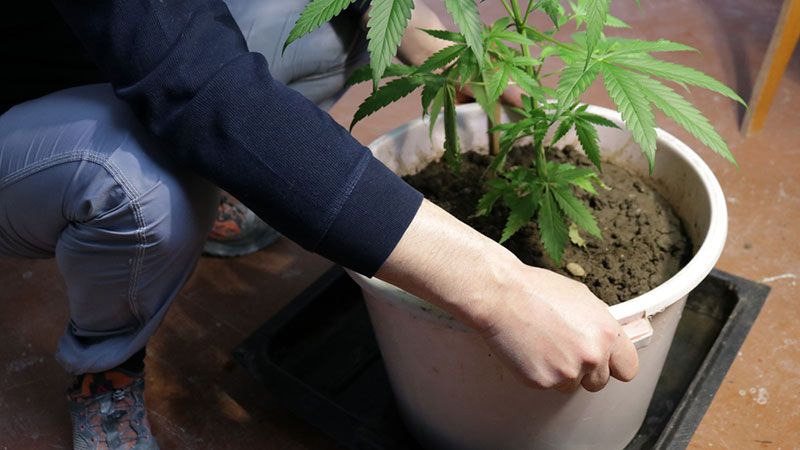
- Position Grow Medium: Position your pots or hydroponic system in the tent.
- Watering System: Set up your watering system (if any).
Correct grow tent setup is crucial for indoor farming efficiency. It ensures optimal use of light, maintains an ideal climate for plant growth, and prevents pest infestations.
Being familiar with the tent setup process is essential for a professional grower as it allows for easier maintenance, upgrades, and replacements. As your growing requirements change, you must adjust your tent accordingly.
Regularly following a checklist to ensure your grow tent works correctly is vital. It helps identify issues early on and keeps plants healthy and productive.
The difficulty level depends on the complexity of the tent and the growing system. Most grow tents are designed for easy assembly and can be set up by one person. However, more complex systems may require additional help or expertise.
Your growing plan is the first thing to consider when installing a grow tent. Knowing what plants you want to grow, how many, and your chosen growing method helps you choose the right tent, lights, fan, and other equipment, such as reflectors, humidifiers, etc.
Most grow tent kits come with the necessary equipment for setup, including cords, hoses, hangers, etc. However, you’ll likely need to provide some tools for assembly. Always check what’s included in your kit before starting the setup.
Table of Contents
- What Materials Are Needed to Install the Grow Tent?
- 7 Steps to Build the Best Indoor Grow Tent Setup
- 1. Set Up a Grow Tent
- 2. Determine Ventilation Setup
- 3. Prepare the Carbon Filter and other Ventilation Equipment
- 4. Install Temperature and Humidity Gauges
- 5. Hang the Grow Lighting System
- 6. Set the Light/Fan Timer
- 7. Set Up Extra Gear
- 7 Mistakes to Avoid During Grow Tent Installation
- What Do You Need to Do After Setting Up the Grow Tent?
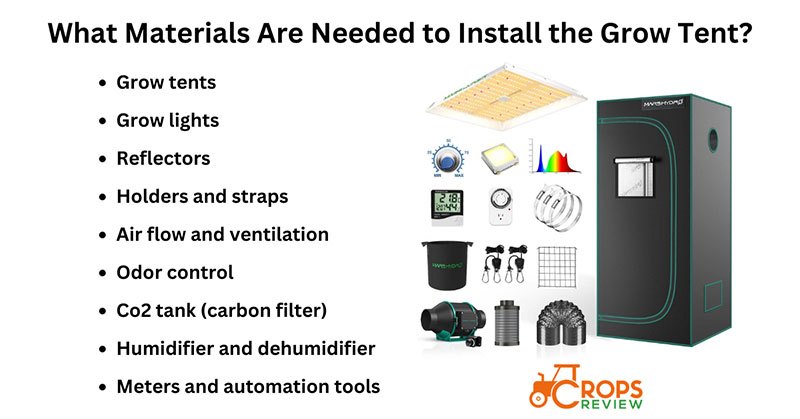
What Materials Are Needed to Install the Grow Tent?
The materials needed to install the grow tent include grow tents, grow lights, reflectors, holders and straps, air flow and ventilation, odor control, CO2 tank (carbon filter), humidifier and dehumidifier, meters, and automation tools.
The grow tent is the most important part of healthy plant growth. It ensures successful indoor gardening when you don’t have outdoor conditions and provides a great environment for various plants, including fruits, vegetables, leafy greens, and herbs.
Grow lights, reflectors, holders & straps are also essential for giving the plants the necessary light to grow. The grow lights simulate sunlight, which is crucial for photosynthesis. Reflectors help distribute the light evenly across all the plants, while holders and straps mount and adjust the lights for the ideal environment without burning plants. If you don’t have grow lights and reflectors, grow tents cannot ensure photosynthesis for a healthy growing environment.
Proper airflow and ventilation in a grow tent are necessary to maintain the right temperature and humidity levels. It also helps to replenish the CO2 that plants need for photosynthesis. Without a ventilation system, the grow tent becomes too humid and hot, causing plants stress and leading to their decay and death.
Some indoor plants like cannabis, marijuana, lavender, jasmine, etc., produce strong smells. Odor control measures like carbon filters eliminate odors and ensure a pleasant atmosphere in the grow tent. You don’t need indoor gardening tools, especially novice growers, if you’re growing plants with no smell, such as tomatoes, cucumbers, or leafy greens.
A CO2 tank (carbon filter) increases carbon dioxide levels inside the grow tent to improve plant growth, as CO2 is a key ingredient in photosynthesis. A CO2 tank is unnecessary for beginners as they often have a small tent. However, as you get more advanced and want to maximize plant growth, a CO2 tank benefits healthy plants.
A humidifier and dehumidifier are devices used to regulate the humidity levels inside the grow tent. Too much or too little humidity harms plant growth, as the dry air closes stomatal openings and doesn’t allow plants to grow healthy. Humidifiers and dehumidifiers are essential parts of the indoor grow tent setup as they keep the optimal humidity levels: seedlings 70-75%, vegetative stages 50-70%, and flowering stages 40-50%.
Meters and automation tools allow you to monitor conditions like temperature, humidity, and light levels inside the grow tent. Automation tools automatically adjust these conditions as necessary if, for example, humidity levels surpass the allowed values. These tools help maintain the optimal plant growth environment, reducing the manual work required. They are not strictly necessary for beginners, but they make managing a grow tent much easier and more efficient as you gain more experience since they offer more control of the grow room.
7 Steps to Build the Best Indoor Grow Tent Setup
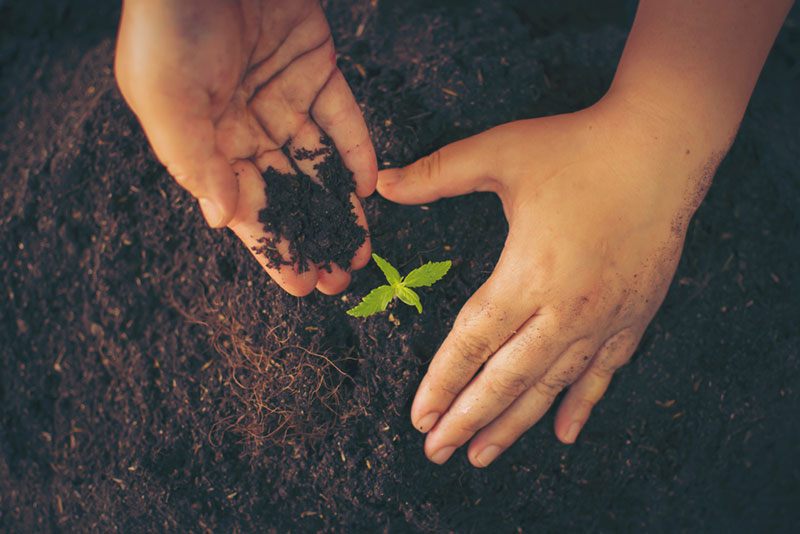
Before diving into the specific setup steps, clearly defining your indoor grow setup is important. This includes determining the type of plant you want to grow, the growing method (hydroponics or soil), and the capacity of your grow area.
The type of plant you choose to grow influences your indoor grow setup. For example, growing herbs like basil or parsley requires less space and light intensity than growing tomatoes or cannabis. Some plants, such as spinach, peppers, strawberries, and lettuce, are better suited for indoor growth because they have smaller root systems, require less sunlight, or grow compactly.
There are two main methods for indoor growing: hydroponics and soil.
Hydroponics is a method of growing plants without soil. Instead, plants are grown in an inert growing medium and fed nutrient-rich solutions. This method allows for precise control over the nutrients the plant receives and leads to quicker growth and higher yields. However, it is more complex and costly to set up than a soil-based system. Examples of hydroponic systems include Nutrient Film Technique (NFT), Deep Water Culture (DWC), and Aeroponics.
Soil growing, on the other hand, involves planting directly into a soil-based medium. This is a more traditional cultivation method and can be easier for beginners to manage. Soil acts as a buffer for nutrients, making plants less likely to suffer from sudden nutrient deficiencies or toxicities. However, growing in soil is harder than hydroponics and requires more frequent watering.
The capacity of your grow area refers to how much space you have available for your indoor garden. The capacity of your grow area will determine how many plants you can grow, what types of plants you can grow, and what kind of equipment you’ll need.
For instance, if you’re using a small grow tent of 2×2 feet, you can grow one medium-sized or large plant – tomato, or four smaller plants – lettuce, for instance. Using a 4×4 grow tent, you can grow between 6 and 10 small plants or 4 large plants like tomatoes in your grow room.
If you’re on a tight budget, a cheap indoor grow setup involves DIY solutions like using regular CFL bulbs instead of LED grow lights or creating your soil mix.
For a micro grow setup, consider smaller plants that require less space and resources, including lettuce, strawberries, and spinach, and use vertical space by installing shelves or hanging planters.
To further educate yourself on indoor growing, consider investing in some of the best indoor growing books, such as “The Indoor Gardening Guide” by D.J. Herda or “Gardening Under Lights: The Complete Guide for Indoor Growers” by Leslie F. Halleck.
Setting up an indoor grow space can take a few hours to a few days, whether you have all the necessary equipment, including the frame, posts, lights, reflectors, etc. It’s definitely possible to do it alone, but having a friend to help can make the process faster and more fun.
Setting up the best indoor grow setup involves a series of 7 steps that should be followed in a specific order: set up a grow tent, determine ventilation setup, prepare the carbon filter & other ventilation equipment, install temperature and humidity gauges, hang the grow lighting system, set the light, fan timer, set up extra gear.

1. Set Up a Grow Tent
Setting up a grow tent involves two main steps: assembling the frame and attaching the tent.
Your grow tent kit should have several metal poles and plastic corner connectors. Use the poles to form the skeleton of your grow tent.
Begin by laying out the poles for the tent’s base according to the manufacturer’s instructions. It is typically a square or rectangle. Connect the corners using the plastic corner connectors.
Next, connect the vertical poles to the corners of the base. These poles will form the uprights of your tent.
Once all the uprights are in place, connect the top poles to form the roof of the grow tent. You should now have a complete frame.
To attach the tent to the frame, unfold the fabric tent and locate the bottom. The bottom is usually the part with the most vent holes.
Place the tent over your assembled frame. It can be easier if you have someone help you with this step. Ensure that the corners of the fabric match up with the corners of the frame.
Once the tent is covering the frame, there should be a heavy-duty zipper that you can use to secure the tent around the frame. Make sure the grow tent is taut and secure.
Grow tents come with additional horizontal support bars that can be added across the top of the frame. These bars can be used to hang lights, fans, or other equipment, such as reflectors, etc.
2. Determine Ventilation Setup
Setting up exhaust and intake fans inside a grow tent typically requires accessories, including wires, cables, screws, and fastening materials, to ensure everything is securely mounted.
Wires/cables connect your fans and other electrical equipment to a power source. For example, if you’re using an inline duct fan, it could come with a pre-wired plug that needs to be connected to a power outlet. You may need extension cords if your power source is not close to your grow tent.
Ducting channels the air from the fans to outside the tent. They are usually made of flexible, heat-resistant materials such as aluminum.
To mount the fans, you may need fasteners such as zip ties and screws. These materials secure the fans to the tent structure.
Adjustable ratchet hangers are often used to hang equipment like fans and lights inside the tent. They can be adjusted easily to change the height of the equipment.
You must determine the size of the fan you’ll use. Calculate the Cubic Feet per Minute (CFM) required for your space to determine the fan size you’ll need for your grow tent.
You can use the following formula: Grow Space Width X Length X Height / 5 = Recommended CFM.
So if you have a 4x4x6 grow tent, you get 96 square feet, divided by 5, which equals 19,2 CFM fans.
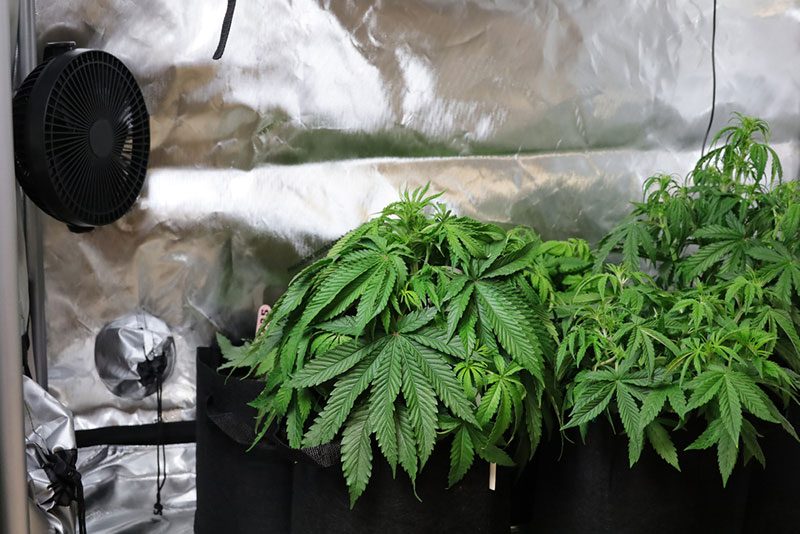
At a minimum, you will need two kinds of fans for a basic ventilation setup: intake and exhaust fans. The exhaust fan is at the highest point possible as heat rises, and exhausting that hot air at that point will make the ventilation more effective. The intake fan should be installed near the bottom of the tent.
In a passive system, your intake hole should be three to four times larger than the exhaust hole to ensure proper ventilation. In an active system, you’ll be using both an intake and an exhaust fan to adjust the fans’ speeds to control airflow.
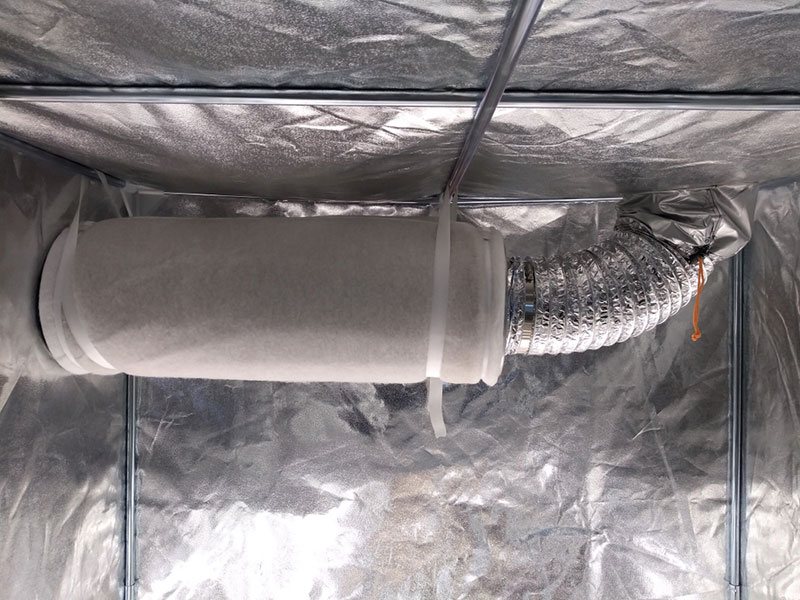
3. Prepare the Carbon Filter and other Ventilation Equipment
You must prepare the carbon filter to eliminate odors inside your grow tent. The best place to install a carbon filter is inside the tent, hanging from the ceiling. Hang the carbon filter from the tent’s roof using straps or chains, connect it to the intake side of the exhaust fan using ducting, and then connect the fan to another duct leading outside of the tent.
However, it could be an issue if you have a smaller tent (2×2 feet, 3×3 feet) or many plants (more than 10), as the carbon filter cannot minimize odors this way.
The carbon filter is attached to the inline duct fan, and it cleans the air circulating through, killing the odors of the plants. So, if you have a smaller 2×2 feet tent, a 4-inch carbon filter kills odors of the plants, typically 2-3 plants. But if you place more plants than recommended, the filter cannot successfully absorb the air moving and odors.
Carbon filters are good for larger tents (6×6 feet, 8×8 feet). As carbon filters are heavy, you may also need additional support, so make sure your tent’s frame can support the weight. For instance, if you have an 8x8x6.5 feet grow tent, you need four 6-inch inline fans with carbon filters. So when one filter, for instance, a Gorilla carbon filter of 4 inches, weighs 7,6 pounds, multiplied by 4, you get 30,4 pounds of filter weight. So, you may need additional fixtures, rods, or bars to prevent the filters from falling off.
For a filter placed inside the tent (but not hanging), place the filter on the tent’s floor, connect it to the intake side of the exhaust fan using ducting, and then connect the fan to another duct leading outside of the tent. This setup is best for smaller, lighter filters and when you have enough floor space in your grow tent.
The advantages include less strain on the grow tent structure, as it won’t add more weight to the frame. The setup is also easier as you won’t hang it to the ceiling. Still, the disadvantages include taking up floor space, as you may have limited floor space in the tent. The carbon can be less efficient since it is not hanging and covering plants.
To place a filter outside the tent, connect the exhaust fan (inside the tent) to a duct, run it outside the tent, and connect it to the filter. This setup is best when you have a small tent with little room for additional equipment, and odor control is less of a priority.
This installation system saves space inside the tent and allows more room for plants and other equipment inside the tent, such as CO2 tanks, reflectors, and humidifiers. It also ensures easier access to replace or maintain the filter if it’s outside the tent.
But the filter won’t be able to catch odors before they leave the tent. You’ll need enough ducting to reach from the fan inside the tent to the filter outside the tent.
4. Install Temperature and Humidity Gauges
Temperature and humidity gauges ensure optimal environmental control by keeping the humidity in a grow tent and temperature optimal – 70-85°F/20-30°C.
Placing sensors is the first step in a good installation process. Placing sensors at the top of the canopy (the upper layer of foliage) provides precise readings of the conditions your plants are experiencing. You can also place them near the pots to monitor the root zone’s conditions. You can also use two, three, or more sensors at different heights, such as 12 inches, 20 inches, etc., to ensure proper humidity and temperature control.
To install them, use zip ties and hot glue to mount them on the wall. You can also use hangers to ensure proper positions.
5. Hang the Grow Lighting System
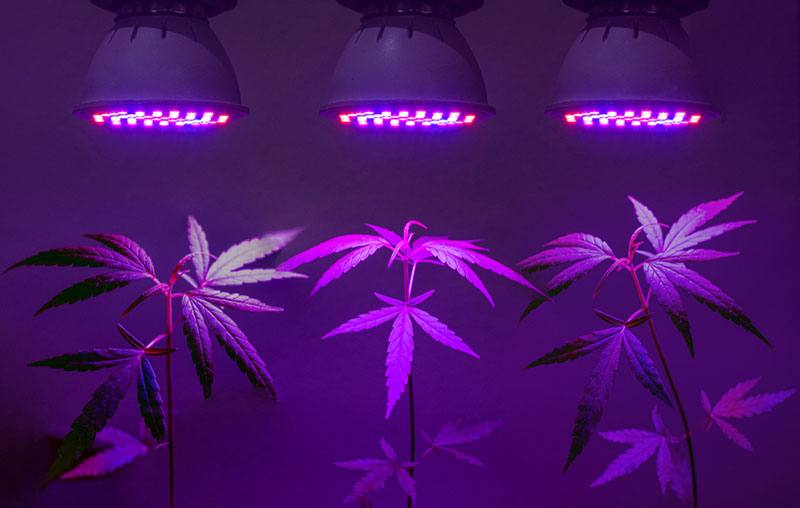
Use LED grow lights in your growing environment since LED grow lights are energy-efficient and produce less heat than other types of lights, HIDs, or HPS lights. You can adjust them to emit light wavelengths typically between 610 and 700 nm to enhance chlorophyll absorption, germination, and flowering stages. Thus, 315-400 nm enhances plant pigmentation, while 440-550 nm blue light ensures the development of roots. The 510-610 nm green light ensures photosynthesis, the 610-700 nm yellow-red light supports bud development, germination, and chlorophyll absorption, while the 700-800 nm red light promotes extension growth.
If you use fluorescent bulbs, they are less expensive than LEDs but less energy-efficient and may need to be replaced more often.
You’ll need the following equipment on how to set up a grow light: the light grow fixture itself (LED or fluorescent), a light hanger or ratchet, an adjustable light stand or tent ceiling to hang the light from, a power source and potentially a timer for automatic control.
To install the grow light, attach the light hanger to the ceiling of your grow tent or your adjustable light stand to support the weight of the light fixture. Attach the light fixture to the light hanger. Make sure it’s secure and level.
Plug the light fixture into your power source. If you’re using a timer, set it to the appropriate light cycle for your plants. For instance, cannabis requires 16 hours of light and 8 of darkness.
The height of your light can profoundly affect plant growth. Too close, and you could burn your plants; too far, and your plants might not get enough light. The ideal distance ranges from 12 to 24 inches. For example, if you use a 45-watt LED light in a small grow tent, you might hang the light about 18 inches above the top of your plants.
However, if you grow tall plants like cannabis, tomatoes, or cucumbers, they tend to grow tall, up to 6 or 7 feet, so you need to set the lights vertically. The plant’s foliage is interwoven with each other, and if you use supplementing lightning on the top, the light has a hard time penetrating the dense foliage to the lower parts of the plants. Placing the light vertically provides adequate light for the plant and the direction of the plant growth. So when you have 8 plants on 32 sq ft, you need 1280 watts and around 30 vertically installed LED lights of 45 watts 24-36 inches above the canopy.
6. Set the Light/Fan Timer
To set the light/fan timer, you will need the following equipment: a light/fan timer, which can be a simple mechanical timer or a more advanced digital timer, an inline fan for ventilation, and a grow light system.
Install the line fan inside the grow tent for efficient ventilation. You can keep it running all day during the day and turn it off an hour after you turn off the grow light system.
Install your grow light systems. Hang them on the ceiling and connect them to a power source.
Connect your inline fan and the grow light system to the timer to automatically control when they turn on and off.
Set the timer to turn your lights and fan on and off at specific times – an 18/6 schedule for vegetative growth and a 12/12 schedule for flowering stages. For instance, if you’re growing cannabis in the vegetative stage, set your timer to turn your lights and fan on at 6 a.m. and off at midnight. Then, set your timer to run the fan for a few minutes every two hours during the dark period.
7. Set Up Extra Gear
Extra gear such as oscillating fans and CO2 controllers improves fresh air circulation and keeps the CO2 levels optimal: 1200-1500 PPM in the growing environment.
Oscillating fans improve air circulation to prevent disease and promote healthy plant growth. To set up an oscillating fan, install it at plant level, ensuring it’s not blowing directly at the plants to avoid wind damage.
CO2 generators also boost plant growth. To use a CO2 generator, place the generator in your tent. Connect it to a timer or controller that turns it on during the lights-on period (when plants use CO2) and off during the lights-off period.
7 Mistakes to Avoid During Grow Tent Installation
Setting up a grow tent requires careful planning and execution. Mistakes during this process can lead to poor plant growth, equipment damage, or even safety hazards.
1. Wrong Installation Order
Mistakes in the setup order lead to inefficiencies and the need for reinstallation. For instance, installing lights, fans, and filters is easier before the tent is fully erected. Installing the parts in reverse order wastes your time and damages the tent or equipment. To avoid these mistakes, plan your tent setup process carefully. Start with installing lights and ventilation systems before erecting the tent.
2. Missing Parts and Tools
Not having all the necessary tools at hand stalls the installation process. Before installing, ensure you have all the necessary tools, such as a screwdriver, pliers, wire cutters, and zip ties.
3. Damaging Plants by Placing Items or Plants Inside the Tent During Installation
Placing items or plants inside the tent during installation can lead to accidental damage to plants or equipment. Clear the tent area before installation and only introduce plants and other items once the tent is fully set up.
4. Choosing a Weight Limit Tent
Choosing a tent that cannot support the weight of your lights, fans, and filters leads to equipment falling, tent damage, or safety hazards. Check the weight capacity of the tent and ensure it can safely support your equipment.
5. Overlighting Your Plants
Too much light or lights that are too close cause burn and light stress, reducing yield.
Ensure your lights are at the correct distance from your plants, and consider using a light meter to monitor light levels.
6. Poor pH Testing With Every Watering/Feeding
Failing to test pH can lead to nutrient lockout, where plants don’t absorb nutrients properly and cause poor plant health. Test the pH of your water/nutrient solution every time you feed your plants.
7. Poor Electrical Safety
Daisy chaining extension cables or power bars and leaving electrical wiring on the floor creates a fire hazard and equipment damage. Use a single, surge-protected power bar for all your equipment and keep all wiring off the floor.
What Do You Need to Do After Setting Up the Grow Tent?
Ensure all your equipment works correctly after properly setting up the grow tent. Test your lights, fans, and any other devices you’ve installed to ensure they turn on and off as expected.
Check your tent’s temperature and humidity levels with a thermometer and a hygrometer. The ideal ranges depend on what you’re growing, but a common range is 70-85°F (20-30°C) for temperature and 40-70% for humidity.
Based on the temperature and humidity readings, adjust your ventilation system. If the tent is too hot or humid, increase the fan speed or open more vents.
Inspect your grow tent for issues
Ensure all electrical connections are secure and not at risk of getting wet. There should be no frayed wires or loose connections. Check for potential fire hazards, like overloaded power strips.
Ensure all hangers and hooks are securely fastened and capable of bearing the weight of your lights, fans, and filters. Double-check to ensure nothing is at risk of falling.
Run your system for a few hours to ensure it’s working properly. The lights should turn on and off according to your timer settings. Fans should operate smoothly without making excessive noise. If anything doesn’t work as expected, it could indicate an issue with your setup.
During your system test, monitor the temperature and humidity inside your tent. They should stay within the optimal ranges for your plants. You might need to adjust your ventilation, heating, or cooling if they’re too high or low.
In a dark room, turn on the lights inside your tent and look for any light escaping from the seams, zippers, or vents. Light leaks disrupt your plants’ light schedule and lead to issues like hermaphroditism in cannabis plants.
To check this, simply darken the room where the grow tent is installed, turn on the grow lights, and look for any light leakage. You may need to seal these areas with reflective tape or another suitable material if you find any.
While your exhaust fan is running, feel around the seams and zippers of your tent for air leaks. If you feel air escaping, your tent isn’t properly sealed, affecting temperature and humidity control.
Ensure your tent’s inside is clean and free of dust, mold, or pests. These can harm your plants and should be dealt with before you start growing.
Use the grow tent growing checklist
Maintaining a grow tent involves regular checks to ensure your plants are healthy. Keeping records of these checks can help you track your plants’ progress, troubleshoot any issues, and optimize your growing conditions over time.
Daily checks include monitoring temperature and humidity, inspecting plants, and checking water levels. Weekly checks include testing pH levels and cleaning the grow tent. Monthly checks require you to inspect electrical equipment, check for light leaks, and examine hangers and hooks. You should replace filters every three months and thoroughly clean the grow tent.
Daily Checks:
- Monitor Temperature and Humidity: Ensure they are within the optimal ranges for your plants.
- Inspect Plants: Look for signs of pests, disease, or nutrient deficiencies.
- Check Water Levels: If using a hydroponic system, ensure sufficient water levels.
Weekly Checks:
- Test pH Levels: Make sure your water/nutrient solution is at the right pH level 6-7.
- Clean the Tent: Remove fallen leaves and clean up any spills to prevent mold and pests.
Monthly Checks:
- Inspect Electrical Equipment: Ensure all lights, fans, and other devices work properly and safely.
- Check for Light Leaks: Turn on the tent lights in a dark room and look for light escaping.
- Examine Hangers and Hooks: Ensure they are securely bearing the weight of your equipment.
Every Three Months:
- Replace Filters: If you use carbon filters for smell control, replace them every three months.
- Clean the Tent Thoroughly: Between growing cycles, clean the tent thoroughly to remove any leftover plant matter, dust, or pests.
Establish your growing method
When setting up a grow tent, your growing method is one of the first decisions you’ll need to make. This decision will influence many factors of your setup, including the equipment you need, how you care for your plants, and what kind of yield to expect.
Soil growing is the most traditional method and often the easiest for beginners. It involves planting directly into soil or a soil mix. The soil provides nutrients and a buffer against pH imbalances and mistakes. However, it might not offer high yields.
Hydroponic systems involve growing plants in water rather than soil. Nutrients are delivered directly to the plant roots through the water. Hydroponics can yield larger, faster-growing plants, but it requires more equipment and careful monitoring of nutrient levels and pH. There are several types of hydroponic systems, including Deep Water Culture (DWC), Nutrient Film Technique (NFT), and Ebb and Flow (Flood and Drain).
Plants are suspended in air in an aeroponic system, and nutrients are delivered through a mist. This method can result in fast growth and high yields, but it’s complex and requires careful management.
Coco coir is made from the husks of coconuts and can be used as a soil substitute. It’s often used in hydroponic systems. Coco coir offers many benefits of both soil and hydroponics, providing a buffer against mistakes like soil but with faster growth and higher yields like hydroponics.
Supply water and nutrients to your plants
When growing plants in a grow tent, provide all the nutrients your plants need to thrive. Purchase a nutrient pack suitable for your chosen growing medium (soil, coco coir, hydroponics, etc.) These packs generally contain a mix of macronutrients (Nitrogen, Phosphorus, Potassium) and micronutrients (Calcium, Magnesium, Iron, etc.)
In addition to a nutrient pack, consider using compost or organic fertilizers. Improve the structure of your soil, add additional nutrients, and create a healthy microbial ecosystem.
A filtration system can be beneficial if your tap water contains high levels of chlorine, other chemicals, or heavy metals. Filtered water can remove these harmful contaminants while retaining essential minerals plants need – potassium, phosphorus, magnesium, nitrogen, phosphorus, sulfur, magnesium, and calcium.
Activated carbon filters are recommended as they are cost-effective and efficient at removing chlorine. However, use unfiltered water if your tap water is relatively clean and contains beneficial minerals.
Manage pests and care for plants in your grow tent
The best way to manage pests is to prevent them from infesting your plants in the first place. Keep your grow tent clean, regularly inspect your plants for signs of pests, and isolate new plants until you’re sure they’re pest-free.
Many growers prefer to start with natural remedies before resorting to chemicals. For example, a diluted solution of rubbing alcohol can help eradicate pests such as mealybugs, aphids, and red spider mites. Another method is spraying your cannabis plants with short bursts of water to knock off any aphids or eggs.
You can introduce beneficial insects or organisms that prey on pests into your grow tent. For instance, nematodes are predatory insects that eat gnats.
If natural remedies aren’t working, resort to chemical pesticides. However, use these sparingly and carefully, as they harm humans and plants if misused, causing plant death and health issues.
When using pest control, always following the manufacturer’s instructions is essential. Don’t apply pesticides during the flowering stage, as they affect the taste and safety of the final product. Rotate different products to prevent pests from developing resistance. After eradicating pests, clear off residue and dead bugs by spraying your plants once with water.