Bonsai shaping is a practice in making artistic “potted trees” that involves skillful works intended to transform a prebonsai stock or bonsai on-training into the desired style.
Among others, bonsai styles include single-trunked formal and informal uprights, slanting, windswept, weeping, literati, semi, and full cascades, broom, and driftwood.
Essentially bonsai shaping includes pruning and wiring of trees that are already growing on training pots.
But how do we go about those newly collected or rescued from the field?
For fresh, bareroot bonsai materials pulled out from the open field, I always practice bonsai shaping prior to planting in a training pot.
So did my mentors many years ago.
This is also the practice of my colleagues in the art in this part of the tropics.
The most dominant tree in this locality for bonsai is the tugas lanhan type of molave or Vitex parviflora, but there are many more.
I do it first mainly by trunk shaping.
This involves pruning in which unwanted branches are removed or select branches are shortened.
When deemed necessary, the initial carving is also done. Root pruning is likewise undertaken.
Recently I discovered a new bonsai shaping technique.
An Ugly Bonsai Material
On July 2, 2019, I was dumped an uprooted bonsai material with multiple trunks.
This molave tree should be deemed unsuitable for bonsai and ought to have stayed where it was, I thought.
– For those using the desktop, please click the picture below to launch the image gallery. –
Yes, I thought that it was “ugly” and should not deserve spending much time and effort to be trained into a fine bonsai.
It had 10 trunks the biggest of which was about 8 cm (more than 3 inches) thick at the widest part of the base.
All were cylindrical like the common candle and the barks were smooth indicating that the trunks were young.
The widest trunk-to-trunk distance was about 16 inches or 40 cm but the entire material including the base from where the trunks emerged and the protruding sideward roots was wider.
The Most Likely Bonsai Style
At first impression, I thought that the best style that could do justice to this tree was a root-connected forest.
Preparatory work will thus entail less effort, that is, mainly cutting of the trunks to a short height.
It will be the easiest to do and planting the tree in a training pot about 60 cm or 24 inches wide in the same manner it grew where it was taken will ensure the survival of the tree.
Bonsai shaping will thus merely include subsequent pruning and wiring.
I thought though that making the new leader stems grow to such thickness and taper that will be proportionate to the stubs of trunks left will take many years.
I deferred and instead embarked on a long period of analysis, squeezing my brain out to find a solution. Here’s what I did.
I Executed Bonsai Shaping Before Planting
Day 1. For one whole day, I just studied the tree from all angles, flipping, reversing, and rotating it from time to time to inspect its top, sides, and bottom.
I learned that the trunks were interconnected except that this was broken at one point with one reddish trunk of a tree which managed to grow within.
The bottom was covered profusely with roots that originated from a common base of the tree.
Roots projected sideward of the tree or compressed at the bottom, indicating that the tree used to grow on shallow ground with solid rock underneath.
I slept late toying with the idea that it would be amazing if I could convert the tree into my favorite cascade style, especially a full cascade.
Day 2. I started the next day reexamining the tree. I washed it with water to remove the dirt to make the parts more visible.
That idea of a cascade has now become more real.
Yes, it’s worth a try removing large segments of the common base from where the trunks emerged and planting the tree sideways.
And so I focused on finding which part was to become the base, the abundance of roots there, the possible movement of the trunk, and which of the original trunks has to become the tip or apex.
I debated on whether the trunk movement should be to the right or left but finally decided on the former.
It means that the base should be that part to the left of that reddish-barked tree with plenty of roots.
I executed the plan by first removing that reddish trunk with the use of a curved chisel. Then I removed the roots except those attached close to the planned base.
Now I could see that indeed the trunks belong to one same tree.
The trunks were cut back with the use of a crosscut saw. And then I removed a large chunk between the base and the tip including two trunks.
More were removed outside of what has to become the main trunk of the bonsai tree.
I wanted to remove more parts to the left of the base but decided against it in order to improve the chance that the tree will survive.
Otherwise, If I so did, I would have removed more roots.
I also thought of doing more carving to remove those bumps, to convert those cuts on trunks into natural-looking deadwood or shari, and to define further the taper of the main trunk but decided likewise that it can be deferred.
Doing so will take plenty of time with my hand tools and the delay in planting may be fatal to the tree due to dessication.
Too much carving may also sever the continuity of bark from base to tip.
It was late in the afternoon when preparatory bonsai shaping was finished.
Immediately the tree was planted into a training pot about 12 inches (30 cm) wide and 8 inches (20 cm) deep.
This means that the executed bonsai shaping technique succeeded in reducing significantly the size of the pot from the supposedly 24 inches wide.
The plastic tent or kulob method was applied.
The potted tree has a height of about 10 inches (25 cm) and a horizontal length of about 16 inches (40 cm).
The tip of the cascading trunk is about 4 inches (10 cm) below the rim of the pot.
The stub of the trunk at the tip is about 1.5 inches or 4 cm thick.
A New Technique
The procedures narrated above reveal a new technique on bonsai shaping. At least it appears so to me.
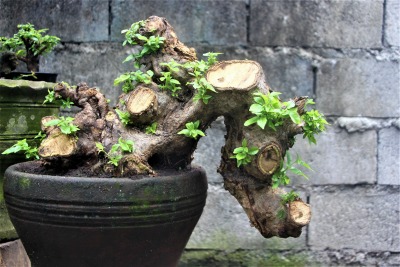
A multiple trunked trees has just been shaped into a single-trunked cascade by carving in which large chunks were removed from the original common base.
It’s been flipped sidewise so that its original top now becomes the front and the original bottom now becomes the rear or back of the tree.
Constant monitoring showed that with only a minimal part of the original rootstock underground, the tree is alive.
Callus developed on the peripheries of cut trunks and on cut roots at the back.
Shoots are also developing both front and back.
I do have a plan of the ultimate bonsai shape and style, but it’s still too early to make it final.
So much will depend on the vigor of the tree and the branches that will develop.