Are you looking for a cost-effective and straightforward solution to extend your 4×4 post? If so, you’re in luck!
This post will provide you with the information you need to get started extending the vertical length of your 4×4 post in no time. We’ll go over everything from the simple supplies needed to complete this project, as well as how best to execute each step.
So, don’t stress out any longer; follow these easy instructions and prepare to enjoy having a superiorly extended 4×4 post!
Take away key points:
- You can connect your 4x4s both vertically and horizontally
- The joint units and bolts will ensure a more stable connection and overall fence construction
- You can opt for various methods, and use different metal, vinyl, and similar plates, to ensure the construction will not damage too soon
Table of Contents
- How to extend wooden fence posts vertically? Best guide!
- Pre-step: Preparing the necessary tools
- Step 1: Choosing the right extender
- Step 2: Cut the extenders to the right size (half-lap joint method)
- Step 3: Purchase the structural screws
- Step 4: Buy fence brackets
- Step 5: Place the extender on the top of the fence post
- Step 6: Screw the extender into the place
- Step 7: Paint the extenders
- Step 8: Install the fence panels
- Extra tips & tricks to extend 4×4 posts
- FAQs
- Final words
How to extend wooden fence posts vertically? Best guide!
If you need to know how to properly extended your 4×4 posts vertically and make the best use of your fencing system, refer to our procedure below.
You will find all tips and tricks, as well as the required steps to keep your fence minimal. Let’s start.
Pre-step: Preparing the necessary tools
To extend 4×4 posts vertically, you will need to prepare the following items:
– Metal fence post extenders or wood face boards
– Screws
– Fence brackets
– Copper tubing or steel conduit (for extending deck posts)
– Half-lap joint (for connecting two posts)
An easy method to extend fence posts is by adding metal fence post extenders or wood face boards on both the front and back of the post.
Another option is using a half-lap scarf joint to connect two 4×4 posts. To extend deck posts, drill axial holes in the center of the 4×4 and insert copper tubing or steel conduit halfway. We will explain the process further below.
Step 1: Choosing the right extender
There are extension pieces available for purchase that are compatible with your existing posts. These extenders come in different materials like metal, vinyl, wood, and concrete.
The choice of the appropriate extender will vary depending on the type of fence posts used in your fence.
Step 2: Cut the extenders to the right size (half-lap joint method)
It is common for extension pieces to come in two-foot increments, but not always. It is possible that some cutting may be required to achieve the desired size and more support posts once the post extenders are purchased.
The tool required for the job will depend on the material of the extension piece. For wood or vinyl extenders, experts suggest using a regular hand saw or a circular saw.
However, if you prefer a quick and precise cut for a desired length, a chop saw may be more suitable. On the other hand, cutting metal extensions will require a metal cutter for your end-cut solution.
Step 3: Purchase the structural screws
It may come as a surprise, but not all structural screws are suitable for use on fences, unlike the regular ones used indoors. Opt for deck screws which are specifically designed for outdoor use and have a galvanized coating for moisture protection of your fencing material. This type of screw will help increase the durability of your fence extensions.
For concrete fence posts, it is necessary to use concrete screws, as they are the only type of screws that can penetrate the concrete. These screws have exceptional strength, and durability, and are construction adhesive support.
Step 4: Buy fence brackets
If you are unsure about what you need when it comes to fence brackets, it can be a confusing process. Various shapes of brackets serve different purposes.
It is important to note that fence brackets may not be necessary for vinyl posts, and if a slotted post extender is being used for concrete posts, fence brackets won’t be needed. Based on your needs, you can choose among wood, concrete, vinyl, or metal fence brackets for your corner posts.
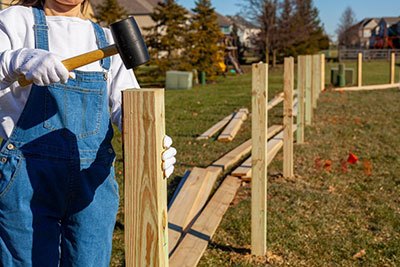
Step 5: Place the extender on the top of the fence post
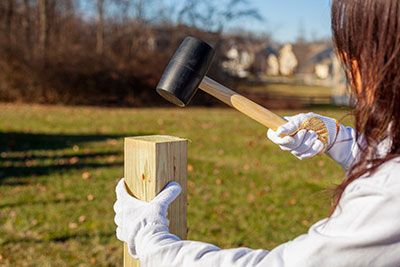
To begin, position the fence extension in the desired location. Before screwing it in place, make sure to use a level to ensure the extension is as close to level as possible. This step is crucial as failing to do so can lead to issues with the fence in the future.
Step 6: Screw the extender into the place
Once you have confirmed that the extension is level, proceed to screw it in place. If you used the half-lap method mentioned earlier, then you have already completed this step.
No matter the post material, it is advisable to drill holes first at the desired screw locations before inserting the screws. This technique prevents damage to the screws and ensures they go in straight, making a secure butt joint. Use a drill bit that matches the screw size.
For concrete posts, use the screws specifically designed for concrete that were previously mentioned, and a carbide-tipped drill bit to create holes in the concrete. You’ll prevent lateral forces and other damage to your fencing system.
Step 7: Paint the extenders
If the first post is painted, you will need to paint the extensions to match them with other posts together. Painting them after they are attached is easier, but it can also be done before you attach them. It is important to choose a sunny day without any rain forecast for the upcoming days to paint all other post units.
To ensure they look as close as possible to the original posts, paint the extensions using the same techniques used to paint the initial posts.
Step 8: Install the fence panels
After extending your fence posts, they should now stand at a height of six feet, allowing you to proceed with the installation of the fence panels. Regardless of the type of post extensions used, the fence panels should easily attach to them.
If you have any uncertainties or queries during the installation process, you can visit the local home improvement store for assistance. They will help you attach and install the fence panels easily, to support your longer piece of joint and construction adhesive length support.
Extra tips & tricks to extend 4×4 posts
Here are some useful tips and tricks to help you vertically connect two pieces of 4x4s on a deck:
1. Use a sturdy attachment method
You want to make sure that your extended posts can handle the added weight and stress. One great option is to use two plates attached to the outside of the joint and extending into the ground. This will give you a strong and stable connection that can handle heavy loads.
2. Consider a half-lap scarf joint
Another option is to use a half-lap joint to join the two posts together. With simple cuts, this method is perfect for beginners or pros and is accomplished with limited tools.
A half-lap joint is a method used to extend posts where two parts of wood are cut at a 90-degree angle with a half-depth cut made in one piece, and then in another. The cuts made allow the two pieces of wood to overlap and create a stronger connection between the joined wooden pegs.
This technique is a great skill for beginner woodworkers to master, and it is commonly used when building with framing lumber post bolts.
To make a half-lap joint, you will need two wood 4x4s, a saw, and appropriate fasteners such as 1/2″ or 5/8″ through bolts. For a more stable connection, you can use construction adhesive and steel plates.
3. Add an extension piece
Use a spacer/nailer 4×4 to secure your face boards onto the extended post. Alternatively, ripped wood on both sides of the post with a face board could also work.
Remember, safety should always be your top priority when making any modifications to your deck or fence. By following this form, you’ll be able to extend your 4×4 posts securely and safely.
FAQs
How do you connect two 4×4 posts perpendicularly?
There are multiple methods you can use. One option is to use metal plates with screws to join the posts together vertically.
Another option is to make a cross-lap joint by cutting into the wood. You can also use a half-lap joint with galvanized washers and bolts.
Regardless of the method you choose, it’s important to ensure the ends of the posts are square and smooth before joining them together.
How do I make my fence post taller?

One popular method is to use 1×6 inch lumber ripped to fit around the post, with a spacer/nailer 4×4 inserted as an extension to nail the face boards into.
Another easy way is to add metal fence post extender fasteners to both posts on the opposite sides – front and back or add a wood face board on the front and back of the existing post.
You can also use wood connectors and purchase two sections of 1×4 inch lumber to extend the post half the length.
What is the strongest way to join 2 4×4 wood posts?
The strongest way to join two 4×4 wood posts is by using a rabbet joint which can be sandwiched between two 18-inch steel plates and bolted through with four equally spaced bolts.
Alternatively, a half-lap scarf joint is known to be simple and non-complex, which makes it an ideal option for beginners to work within a limited space.
Additionally, counter-sunk stainless steel lag bolts coupled with Gorilla Glue can be used to join multiple 4×4 pressure-treated butt joint units together.
How to extend a 4×4 post horizontally?
Follow the steps below:
– Prepare the tools and materials: Before beginning the project, make sure you have all the necessary tools and materials including a saw, screws, brackets, and a level. Choose materials that are sturdy, weather-resistant, and comply with local building codes. Complying with codes is essential to prevent any legal issues or potential safety hazards.
– Calculate the extension measurements: Measure the required length of the extension you want to add to your 4×4 post and purchase lumber that measures that length. Cut the new lumber to size and prepare it according to the instructions.
– Attach the extension lumber: Attach the extension lumber to the existing post using brackets and screws. It is important to use a level to ensure that the post does not tilt or slip while attaching.
– Secure the connection: After attaching the brackets, check and adjust the post to ensure that everything is held in place securely. Finalize the post connection by adding additional screws to connect the brackets to the extended post.
Final words
We hope you now better understand how to link your 4x4s and make stable joint bolts. There are different techniques you can apply to keep the fence optimal, so ensure you know all the steps to finish the job effortlessly.