Every farmer will tell you electric fence is an absolute necessity for successful posture management and controlled grazing.
And each one of them will share a hack or two of his own on how to install one correctly.
In reality, building a functioning electric fencing system can turn into a disaster if you’re not familiar with the concept.
We composed an ultimate guide, including the informal tips from cattle ranchers, detailed explanations, and official guides to help you learn how to install electric fence systems most efficiently, so stay tuned.
Table of Contents
- How Does an Electric Fence Work?
- Types of Electric Fences
- Do I Need Temporary or Permanent Fencing?
- How Do I Prepare for Electric Fence Installation Process?
- What Electric Fence Supplies Will I Need?
- Installation Summary
- Detailed Step by Step Guide on Electric Fence Installation Process
- Frequently Asked Questions
- Conclusion
How Does an Electric Fence Work?
An electric fence system is basically a closed electric circuit. It has its source of power, conductor, insulators, and a grounding system.
You can power it from different sources, and the most common is a 110V AC power outlet.
Basically, the power is fed into a fence charger and then transformed into high voltage pulses.
These high voltage pulses are pushed through the hot line terminal into the fence wire, and the current flows through your fence.
Now, the ground rods buried in the soil are connected to the ground wire that is connected to the ground terminal of the charger.
When someone gets in contact with the wire, the pulses go through the body, to the ground rods, and then back to the charger, and the animal or person experiences a shock.
This system works as a psychological barrier that teaches the animal not to cross the limits of the fence.
At the same time, it keeps the predators away, thus protecting the livestock from dangerous wildlife.
Types of Electric Fences
There are two basic kinds of electric fences you can install: temporary and permanent.
Some farmers also differentiate semi-permanent fences, but these are just slightly less durable than permanent fences.
Besides the obvious difference between the two, the fences have distinct purposes and characteristics.
Temporary fencing is mainly used for controlled rotational grazing and control of slow-moving animals.
The type of wires it usually incorporates are lightweight wires, easy to set up and remove, such as poly wire or poly tape.
They don’t last long and are easy to relocate, which is why we call them temporary.
On the other hand, permanent fencing is used for long-distance enclosure of fast-moving livestock and usually includes high-tensile electric wire.
Naturally, it is more demanding and more time-consuming to install, but it lasts longer and performs better when it comes to controlling fast-moving animals like horses.
Do I Need Temporary or Permanent Fencing?
To choose the right type of electric fencing system, you need to think about the context.
You should figure out the reason why you are installing the fence in the first place, but also the resources you have to build it properly.
This context boils down to a few key points:
- Budget
- Landscape
- Wildlife and livestock pressure
Temporary fencing is less expensive, less demanding, and quicker to install.
However, it is a short-term solution that won’t contain fast-moving livestock, let alone repel wildlife.
So, if you need cheap, quick fencing to manage intensive grazing or contain smaller animals, it will work.
If you need long-distance fencing, though, that will withstand different weather conditions and last for decades to come; you need a permanent solution.
It keeps the wild animals away and livestock securely contained. But, it does require more expensive material and more effort.
How Do I Prepare for Electric Fence Installation Process?
First of all, it is critical to find the right spot to install electric fencing.
It is preferable to avoid soil that is too dry because it is not a good conductor, but we’ll get to that point later.
Once you’ve chosen the spot, measure the space you’d like to enclose with electric fencing.
The best way to do it is with the measuring wheel because it not only measures the land but it lets you feel all the bumps and valleys on the ground, so you know what you’re dealing with and plan accordingly.
Once you have the measurements, you can choose the type and quantity of the material you’ll need.
Then you should figure out where the gate will go and how spacious it should be.
The rule is to determine what the biggest piece of equipment you’ll take in and out is and make the gate spacious enough for it.
Also, you want to determine where the sources of water will be and potential shelters if needed.
So, to sum it all up, there are four main preparation steps:
- Find the right spot
- Measure the space out
- Figure out where the gate will go
- Determine where the sources of water and shelters will be
What Electric Fence Supplies Will I Need?
Necessary equipment that is the base of every electric fence system is the following:
- Power source
- Ground rods
- Electric charger
- Wire
- Insulators
- Fence posts
- Corner strainers
Installation Summary
- First things first, find a secure place for your fence charger near an AC outlet, solar panel, or battery. It should be a closed facility, protected from the weather, or you can opt for chargers with protective housing that is itself weather-resistant.
- Set up fence posts around the area you want to enclose. They should be around 15-20 feet apart and one-third of the length in the ground. If your terrain is straight and flat, you can install them a bit farther, and if it’s hilly and bumpy, you should install them closer together.
- Brace the corner posts. Since they withstand the most stress, corner posts need to be reinforced with braces, and they are usually longer and wider than other posts in the fence.
- Mount wire insulators on fence posts. Choose them in accordance with the type of wire you will use and the type of posts you set up.
- Run the wire along the entire fence. You should use the insulators to correctly connect the wire to the posts, and depending on your needs; you can have one or more wire lines along the fence.
- Install grounding rods. You should use at least three 6 feet long grounding rods; install them near the charger and about ten feet apart from each other. The grounding rods should be at least 4 feet in the ground, but the rule of thumb is to leave only two inches above the ground.
- Using a ground rod clamp, connect the ground wire to the ground rod, and then connect it to the ground terminal on your fence charger.
- Connect the fence wire to the fence terminal (hot red terminal) on your electric charger.
- Turn your electric charger on, and test the fence line.
Detailed Step by Step Guide on Electric Fence Installation Process
1. Electric Chargers
There are four main factors that determine the type and strength of the fence charger you should get:
- Power Source
- Wire Length
- Number of Wires
- Livestock pressure
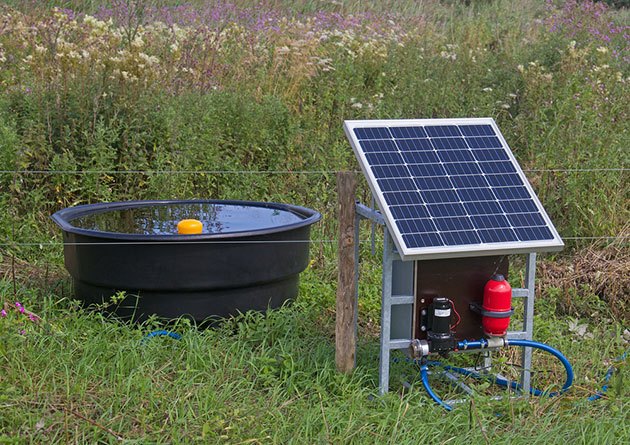
Electric fence chargers can be AC-powered, DC-powered, or solar-powered.
AC-powered chargers give the best output, so they are the most commonly used type for permanent long-distance fences.
They are great if you have a reliable AC outlet at your disposal and high livestock pressure.
DC-powered chargers use batteries as a source of power, and they are a primary choice for remote locations where you don’t have access to an AC outlet.
They are not recommended for areas with a lot of vegetation because the weed constantly touching the wire will drain the battery quickly.
A solar charger is great for sunny remote areas where continuous output is needed.
They work in a way that the solar panel collects the energy from the sun and powers up the battery, which is then used to power the charger.
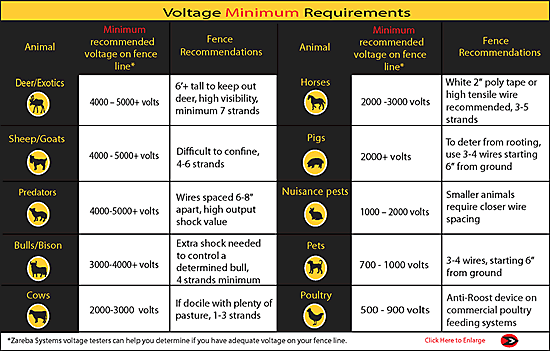
Depending on the number of electrified wires you are running through the fence and livestock, you choose the voltage.
Here’s a great video comparing energizers by their voltage and output:
Installation
You should install your energizer somewhere where it is protected from the weather and close to the power source.
You want to mount it securely to the wall through the hanger hole on the case but not too far from the grounding rods.
Before you turn it on, you want to connect the insulated ground wire to the ground terminal and the hot fence wire to the fence terminal.
The fence hook-up wire should be at least 20,000 volts or higher.
For solar charger installation, watch this video.
2. Fence Posts
Fence posts can be wooden, metal, plastic, or fiberglass.
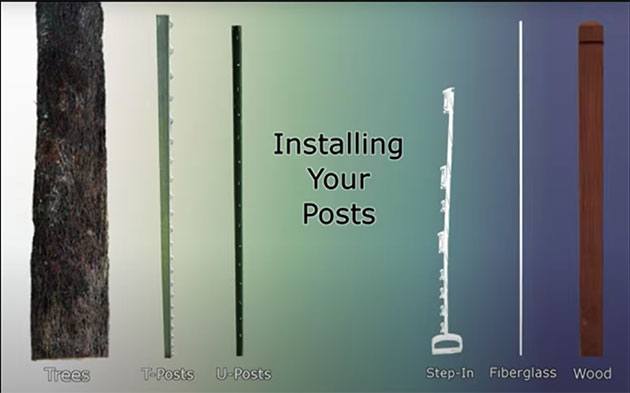
Wood posts are the most durable, but they degrade over time.
Most beginners avoid wood posts because they are the most complex to install, but once you’re done with them, the fence will be sturdy and stable.
For a temporary fence, you can use simple step-on posts since they are the most straightforward to install.
Installation
First, you should use the mason line and stakes to outline the placement and direction of the fenced area.
Make sure to take the gate into consideration, water sources, and the movement of your livestock.
If you’re getting a fence on a straight flat surface, there’s no reason to place posts closer than 15 feet.
Then, using a post-hole digger, you dig the holes for your posts and hammer each into the ground.
You should make sure you have just enough fence posts and not overdo it, especially if there are no hills and bumps.
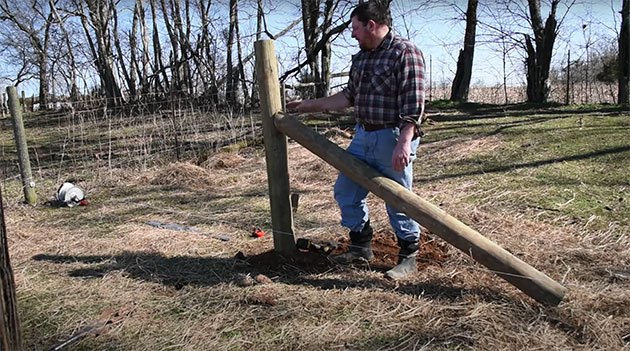
As for your corner post, you should brace it for additional support.
The most effective brace for a 1-8 wire fence is a floating diagonal brace that should be at least double the length of your highest wire and placed at an approximately 45-degree angle to brace your corner post.
See the picture below for reference.
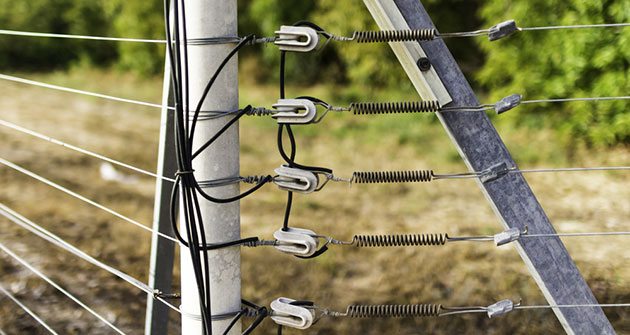
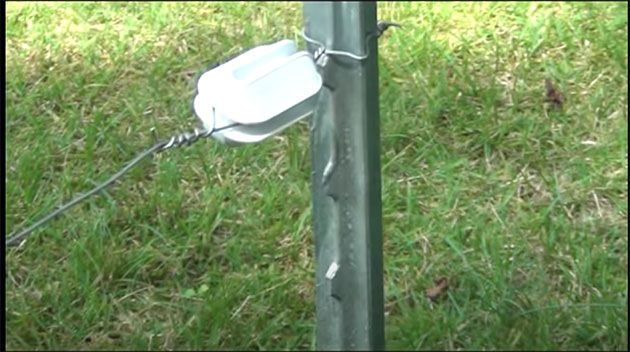
3. Wire Insulators
Once you install posts, the next important segment is to attach wire insulators.
Now, there are different models of wire insulators.
They are designed for different types of posts and different types of wires.
Since they are mainly made of plastics, you should opt for high-density plastic insulators that won’t break easily and special corner insulators for your corner posts.
Now, they are like plastic hooks. There are snap-on models and screw-in models.
I definitely recommend the screw-in models because they can be more securely mounted to the posts and usually have a tighter grip. But it all depends on the posts you have.
For ground wire, most people use tube insulators, which are basically sleeves you put on the wire and prevent the loss of energy.
Also, the wire that goes under the gate should be in a tube insulator to prevent water damage or loss of electric current.
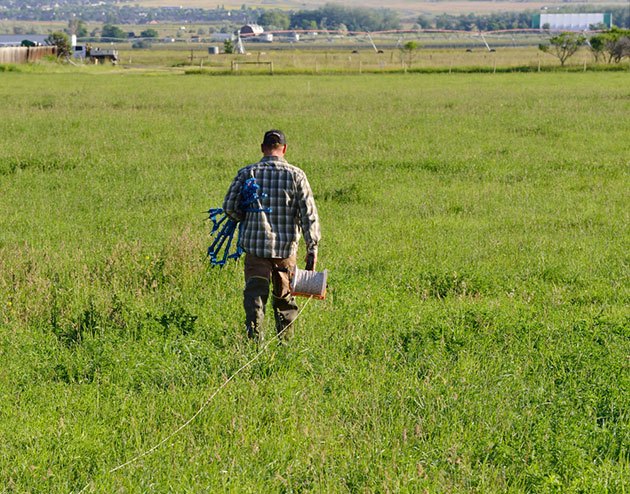
4. Running the Wire Line
As I already mentioned, there are different types of wires you can use for your electric fencing system.
The most commonly used wire for permanent long-distance fences is the high-tensile steel wire.
It’s a great conductor and lasts the lifetime of the fence, so you don’t have to replace it frequently.
More visible options are poly tape and poly rope, and they are often used for training, but these are not as good conductors as a high-tensile wire.
One common mistake beginners make is using a household-grade wire.
The problem is that most household wires are rated at 600 volts, and you’re basically putting 6000-10000 volts through it.
And while it will work for a while, it’s just a matter of time before it burns out.
So, it is of the highest importance to choose a wire that has a rating of 20000 volts at least.
Now, when it comes to the number of strands, you need at least one strand of electrified wire installed at the nose height of the animal you are containing.
From there, you should just consider additional needs.
If you have smaller cattle, you need to plan for them too. So your next strand should be at their nose level. Then, you should also consider grazing.
You want them to avoid the fence line as they are grazing, so you need one strand at the bottom.
Also, if you are protecting the livestock from predators, consider that too.
For example, wolves can easily go under the fence placed at the nose level of a cow. Hence, you need another strand for them.
Installation
You want to start at the post the farthest from your charger.
For this post, you should use a special corner insulator, run the wire through it, and tie it into a special high-tensile knot.
Refer to the picture below for reference.
If you’re using a poly rope, tie it into a sailor’s knot.
Then, pull the wire line to the next post and connect it to the insulator.
Repeat the same step on every post.
Ensure there is no sag in the wire between the posts, but don’t tighten it too much so that it doesn’t break.
To tighten the wire, use a wire strainer, your come-along cable puller, or fence pliers if you have to connect two ends of the wire. This practice is what farmers call wire splicing.
The end of the wire should be connected to the fence terminal of the charger.
When it comes to the gate post and gates, they should be positioned in the corners of the fence, not the middle.
If you want to keep the gate opening non-electrified, you can bury the isolated hook-up wire under the gate and connect it to the lowest electrified wire on the fence using fence taps.
Do the same on both sides, and then hang your gate.
If you want an electrified gate, you should use the gate handle kit, consisting of a handle, two gate anchors, and insulators.
Gate anchors are insulators with a metal base that allow you to connect it to the electrified wire and maintain the electric current through the gate.
Basically, your gate wire or cord should be the same as the wire you are running through the fence.
The handle should be connected to the live gate anchor and the other side of the gate wire to the non-live anchor on the opposite post.
That way, when the gate is closed, the electric current flows, and when you open it, it doesn’t.

5. Grounding System
To install your grounding system, you first need the grounding rods.
These rods are made of copper or galvanized steel, but the copper ones are better conductors, so most people opt for them.
Now, grounding posts should be six feet long, and they require ground rod connector clamps made of the same material as the posts themselves.
You will use the connector clamps to connect the wire to the grounding rods.
And the last thing you need is the insulated hook-up wire (10-14 gauge).
The soil where you will install the grounding rods should be moist and at least 50 feet apart from any other grounding system, be it water pipes or electricity posts.
If your soil is always dry and not a good conductor, you can install a positive-negative fence line that doesn’t rely on the ground itself.
You are basically hooking some of the wires to the positive side and some of the wires to the ground opposite.
So, when the animal gets in contact with both positive and negative wires, it gets shocked.
Installation
Before anything else, what you want to do is mark the spots where you will place the ground rods.
The first grounding rod should be near the energizer, and then there should be a 10 feet distance between the next two.
Using the post driver or a hammer, drive the ground rods deep into the ground, leaving only two inches above the ground for the wire connection.
Put the grounding clamp on each ground rod, and connect your jumper wire to the rods.
After you’ve confirmed the energizer is turned off, you can connect the other end of the electrical wiring to the ground terminal on your energizer.
And, your grounding system is done.
Check the installation
Once you’ve connected both the hot wire and the grounding wire to the energizer, you can turn on the energizer and check if your electric fence is installed correctly.
To do so, you’ll need a voltmeter (a.k.a tester).
You basically place it on the wire at different points, and it should read the voltage adequate for your charger.
As you are getting farther from the energizer, the voltage can drop, but not too much.
If the difference is higher than, let’s say, 2000 volts, you might have a short circuit.
These checks should be done regularly so that you are sure everything works properly and your fence has a clear straight line throughout the entire fenced area.
Frequent Installation Mistakes
Probably the most common farmers make is not having a good grounding system.
It can be because they used a single rod, for example, or they did not bury it deep enough. Or, the problem can be the soil itself.
So, what you want to do is take a voltmeter, place it on a ground rod, and it shouldn’t read more than 0.04 kilovolts.
If it reads more than that, it’s a sign that you don’t have a good grounding system.
The second mistake is not taking care of the vegetation. Plants can significantly impact the electric circuit pressure.
High vegetation that is continually touching your hot wires drains the power line and causes the shock to be significantly less effective.
You want to keep your hot wires clear, especially if you’re using a battery power source.
So, you should keep the weed short and remove any vegetation near the lowest steel wire.
The third mistake is missing to do your voltage reading.
To maintain a functioning electric fence over time, you need to do your voltage reading every now and then and ensure everything works fine.
Basically, it is always better to overpower your fence than under-power it because, over time, the soil drainage and vegetation will affect the voltage, either way, so you want to at least have a good starting point.
And finally, you need to customize the fence for your livestock.
For example, goats and sheep have smaller hooves, so they don’t ground out well. Plus, the wool is thicker than the cow’s coat, and the shock is not quite effective.
Therefore, contrary to the popular belief, it is these animals that require larger energizers and higher voltage shocks than, for example, cows, horses, or even bears.
Frequently Asked Questions
Does an electric fence have to make a complete loop?
Absolutely yes.
To have an effective electric fence, you need to have a power source that will feed the electricity into the charger.
The charger then transforms the electricity into high voltage pulses and, through the fence terminal, pushes the pulses into the fence wire.
The pulses are then received by the ground rods, and through the ground, wire is fed back into the charger.
When an animal touches the wire, the electricity flows through the animal to the ground rods and back to the charger, completing the full circuit and resulting in a shock.
Can you install your own electric fence?
Yes, with the help of a friend, of course.
You just need the proper hand tools, up-to-date information, and some skill.
It’s not a few hours of work, but if you make sure that you plan everything out and follow a detailed step-by-step guide, you can do it.
Some of the tools that you will certainly need are fence pliers, a post hole digger, a fence strainer, a hammer, gloves, and electric fence supplies.
Can you put two energizers on an electric fence?
Never. Using two fence chargers on the same electrical fence could be a potential hazard.
First of all, this will damage both chargers and potentially harm the animal.
Since these pulses are sent in combination, they could be much stronger than initially intended and seriously harm the animal that gets in contact with the fence line.
How deep does an electric fence ground rod need to be?
Grounding posts should be at least four feet deep into the ground.
But, most ranchers use six feet long grounding posts, and they leave only two inches above the ground.
So, that’s the common rule.
Drive your rod into the ground to the point where there are only two inches left.
Don’t choose ground posts that are shorter than six feet.
For what matters, they can be even eight feet long, but if they are too short, your grounding system may not work.
What number of ground rods do I need for the electric fence?
Well, it is best to use at least three.
The rule is to use at least one, but for substantial fence wires, you will need three.
Basically, it is best to analyze how much fencing you want to put up and how strong the electric current should be.
Then you can ask some experienced farmer for advice, but most people use three six feet long ground posts.
Conclusion
That was all about how to install an electric fence.
I genuinely hope you found this article helpful and gained some basic understanding of the electric fence system that will help you work your way through the farming difficulties.
When choosing electric fencing, don’t forget to plan ahead. Figure out your budget, resources, and livestock pressure.
As I already stressed, it is essential to figure out the context and build a fence that fits it.
Another thing to remember is that a new electric fence won’t maintain the same voltage over time. Therefore, check your wires every once and a while to ensure the system works as desired.
If you found this text relevant, check out more of our personalized content.
GREAT INFORMATION THANK YOU
Very helpful. Easy to understand. Answered my questions